Kubernetes - Configure BGP for Kubernetes#
572 words | 8 min read
In the previous post, we installed Almalinux on all 3 nodes, and created partitions that we will use later for persistent in-cluster storage using Longhorn.
This is what the nodes in our cluster look like:
Kubernetes Cluster#
Now, let us look at the steps to configure networking for our Kubernetes cluster using BGP.
I use a router running OPNSense. It has multiple network interfaces that can be configured for WAN, LAN etc.
I configured one of the spare network interfaces on the router for the Kubernetes network because I wanted to set up Kubernetes outside my LAN IP address range. You might need to follow steps that are specific to your router.
I then connected an unmanaged switch in order to connect multiple computers on tha interface.
You could also use VLANs if your router or switch supports it, to assign a unique IP address range for Kubernetes.
Configure the network interface on the router#
Open the UI to your router (assuming it’s OPNSense)
Navigate to Interfaces -> OPT1 (or whatever your interface is called)
Enable the interface (checkbox)
IPv4 Configuration Type = Static IPv4
IPv4 Address = 10.2.0.1
IPv4 CIDR Suffix = 16
Note
You can use a smaller IP address range such as 10.2.0.1/24. However, you will have to adjust the IP addresses used in subsequent steps when configuring Kubernetes.
You can use this Visual Subnet Calculator to calculate your desired subnet ranges for Kubernetes.
Configure IP addresses for each node#
You can configure each node with a static IP address, or just statically map the DHCP IP address for each node.
Warning
Static mapping of DHCP addresses is not recommended, but it is sufficient for our purposes. If you want to be really sure of not having any duplicate IP addresses, assign static IP addresses to each node.
I configured the following IP addresses for my computers:
salt: 10.2.7.10
kube001: 10.2.7.11
kube002: 10.2.7.12
I then set up firewall rules to allow the Kubernetes nodes to be reached from my LAN and verified that I can SSH into each node.
We will use these IP addresses next as we set up BGP on the router.
Configure BGP on the router#
These steps will show how to configure BGP on OPNSense. However, the values used here should give you a good idea of configuring BGP on your router.
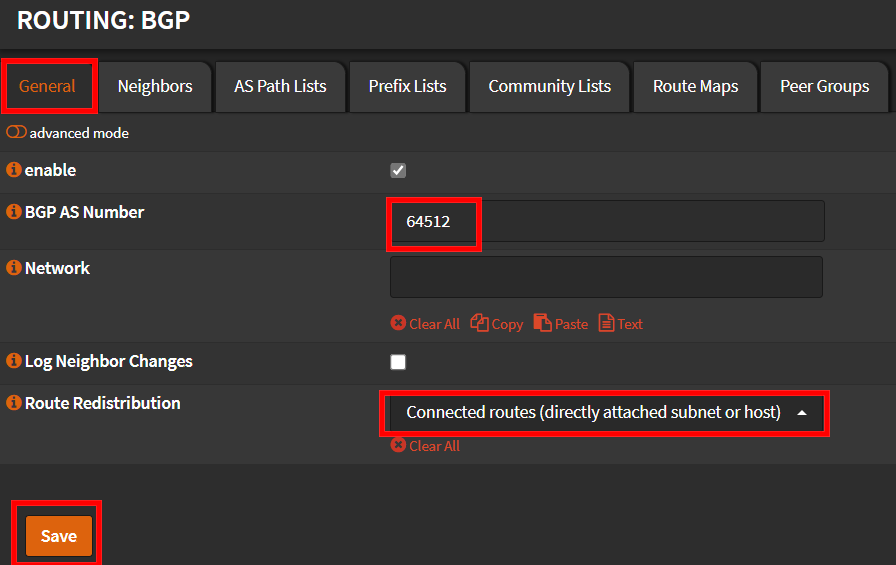
First, we need to decide on an Autonomous System Number (ASN) for our network. I picked 64512 from the private ASN range.
Navigate to Routing -> BGP
In the “General” tab, select the “enable” checkbox
In the “BGP AS Number” field enter the ASN (e.g. 64512)
In the “Route Redistribution” field, select “Connected routes (directly attached subnet or host)”
Save the settings
See the screenshot below for what it should look like after all the info is entered.

OPNSense BGP Configuration#
Configure BGP neighbors on the router#
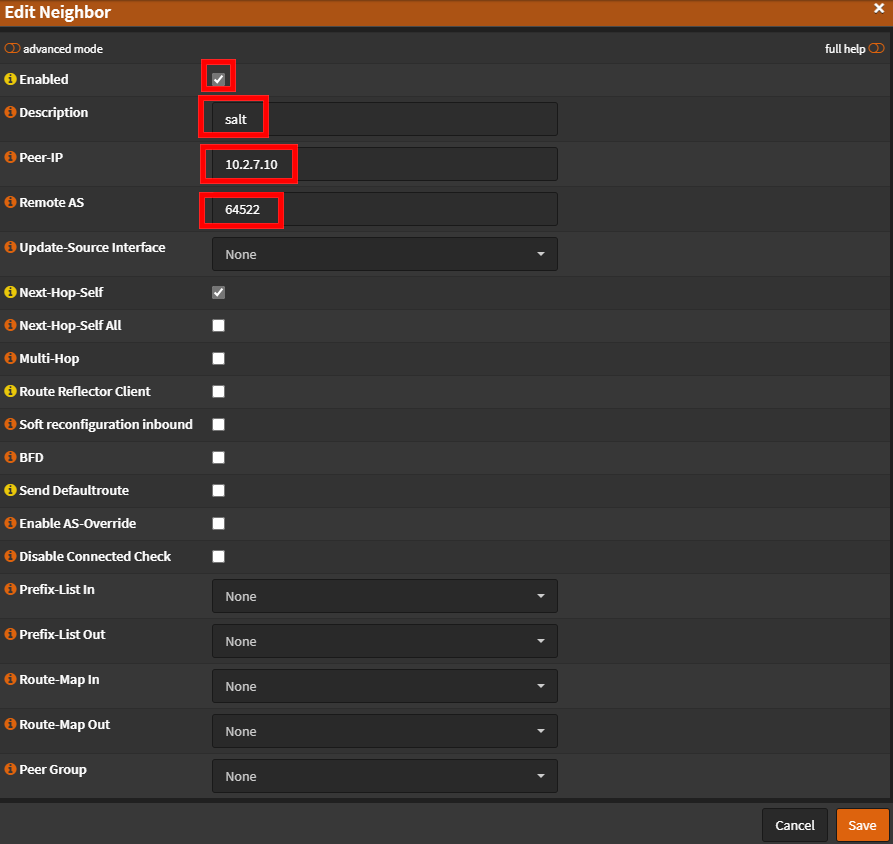
Next, we will configure the neighboring (peer) Autonomous system (i.e. the Kubernetes network). We will use 64522 (again, from the private ASN range) for the neighboring network.
Click on the “Neighbors” tab and click the “+” button to add a new entry. Then enter the following values:
Select the “Enabled” checkbox
Enter a descripton e.g. “salt” (using the same name as the Kubernetes node makes it easier to identify).
Specify the IP address of the BGP peer (e.g. 10.2.7.10)
Enter the remote ASN (e.g. 64522)
Save the settings
Repeat the above steps for the remaining Kubernetes nodes too.
The screen should look similar to this screenshot below:

OPNSense BGP Neighbor Configuration#
At this point, you should be ready to start the Kubernetes installation and configuration as we will cover in the next few articles.

Comments
Comments powered by giscus, use a GitHub account to comment.