Kubernetes - Configure Networking for the cluster#
653 words | 9 min read
In the previous post, we installed k3s on the worker nodes and verified that they had joined the cluster. However, the status was still “NotReady” for each node.
Now, we will configure networking in the cluster and get it ready for running our workloads.
As previously mentioned, we will use Cilium as our Container Network Interface (CNI) aas well as the load balancer.
1. Install the Cilium CLI#
You can follow the steps listed here if you wish.
Or, create a script with the contents shown below, and execute it.
CILIUM_CLI_VERSION=$(curl -s https://raw.githubusercontent.com/cilium/cilium-cli/main/stable.txt)
CLI_ARCH=amd64
if [ "$(uname -m)" = "aarch64" ]; then CLI_ARCH=arm64; fi
curl -L --fail --remote-name-all https://github.com/cilium/cilium-cli/releases/download/${CILIUM_CLI_VERSION}/cilium-linux-${CLI_ARCH}.tar.gz{,.sha256sum}
sha256sum --check cilium-linux-${CLI_ARCH}.tar.gz.sha256sum
sudo tar xzvfC cilium-linux-${CLI_ARCH}.tar.gz /usr/local/bin
rm cilium-linux-${CLI_ARCH}.tar.gz{,.sha256sum}
1.1. Verify the Cilium CLI installation#
cilium version
You should see output similar to the following:
cilium-cli: v0.15.22 compiled with go1.21.6 on linux/arm64
cilium image (default): v1.15.0
cilium image (stable): v1.15.7
cilium image (running): unknown. Unable to obtain cilium version. Reason: release: not found
2. Install the Cilium Gateway API CRDs#
Since we want to use the Kubernetes Gateway API (and not Ingress), we need to install the Cilium Gateway API Custom Resource Definitions (CRDs).
Important
The Cilium Gateway API CRDs MUST be installed before you install Cilium.
/usr/local/bin/kubectl apply -f https://raw.githubusercontent.com/kubernetes-sigs/gateway-api/v1.0.0/config/crd/standard/gateway.networking.k8s.io_gatewayclasses.yaml

/usr/local/bin/kubectl apply -f https://raw.githubusercontent.com/kubernetes-sigs/gateway-api/v1.0.0/config/crd/standard/gateway.networking.k8s.io_gateways.yaml

/usr/local/bin/kubectl apply -f https://raw.githubusercontent.com/kubernetes-sigs/gateway-api/v1.0.0/config/crd/standard/gateway.networking.k8s.io_httproutes.yaml

/usr/local/bin/kubectl apply -f https://raw.githubusercontent.com/kubernetes-sigs/gateway-api/v1.0.0/config/crd/standard/gateway.networking.k8s.io_referencegrants.yaml

/usr/local/bin/kubectl apply -f https://raw.githubusercontent.com/kubernetes-sigs/gateway-api/v1.0.0/config/crd/experimental/gateway.networking.k8s.io_grpcroutes.yaml

/usr/local/bin/kubectl apply -f https://raw.githubusercontent.com/kubernetes-sigs/gateway-api/v1.0.0/config/crd/experimental/gateway.networking.k8s.io_tlsroutes.yaml
3. Install Cilium#
3.1. Create the Cilium Config YAML#
Using a config file like this will reduce the additional steps needed to configure Cilium for our purposes.
# cilium-install.yml
cluster:
  id: 0
  name: kubernetes
encryption:
  nodeEncryption: false
ipv6:
  enabled: true
ipam:
  mode: cluster-pool
  operator:
    clusterPoolIPv4MaskSize: 20
    clusterPoolIPv4PodCIDRList:
#       - "172.25.0.0/16"
      - "10.42.0.0/16"
k8sServiceHost: salt
k8sServicePort: 6443
kubeProxyReplacement: strict
bgpControlPlane:
  enabled: true
gatewayAPI:
  enabled: true
reuse-values: true
l2announcements:
  enabled: true
k8sClientRateLimit:
  qps: 5
  burst: 10
externalIPs:
  enabled: true
operator:
  replicas: 1
serviceAccounts:
  cilium:
    name: cilium
  operator:
    name: cilium-operator
tunnel: vxlan
3.2. Install Cilium#
cilium install --version 1.15.7 --helm-values cilium-install.yml
Wait for the installation to finish.
3.3. Check the Status of the Cilium installation#
cilium status
You should see output similar to the one below
    /¯¯\
 /¯¯\__/¯¯\    Cilium:             OK
 \__/¯¯\__/    Operator:           OK
 /¯¯\__/¯¯\    Envoy DaemonSet:    disabled (using embedded mode)
 \__/¯¯\__/    Hubble Relay:       disabled
    \__/       ClusterMesh:        disabled

Deployment             cilium-operator    Desired: 1, Ready: 1/1, Available: 1/1
DaemonSet              cilium             Desired: 3, Ready: 3/3, Available: 3/3
Containers:            cilium             Running: 3
                       cilium-operator    Running: 1
Cluster Pods:          1/1 managed by Cilium
Helm chart version:    1.15.7
Image versions         cilium             quay.io/cilium/cilium:v1.15.7@sha256:2e432bf6877d6fd784b13e53456017d2b8e4ea734145f0282ef0: 3
                       cilium-operator    quay.io/cilium/operator-generic:v1.15.7@sha256:6840a6dde703b3e73dd31e03390327a9184fcb88b9035b54: 1
3.4. Check the status of the nodes in the cluster#
k get nodes
The resulting output should be similar to the one below. We can see that the nodes statuses have now changed to “Ready”.
NAME      STATUS   ROLES                       AGE     VERSION
kube001   Ready    <none>                      51m     v1.30.2+k3s2
kube002   Ready    <none>                      51m     v1.30.2+k3s2
salt      Ready    control-plane,etcd,master   5d18h   v1.30.2+k3s2
However, if you check the BGP routing status on your router (Routing -> Diagnostics -> BGP option in OPNSense), you will still be unable to see the Kubernetes listed there. We will next enable the nodes to communicate over BGP.
4. Configure BGP in the Kubernetes Cluster#
4.1. Create the BGP Policy Config file#
Create a YAML file (bgppol-01.yaml) with contents similar to the one below:
apiVersion: "cilium.io/v2alpha1"
kind: CiliumBGPPeeringPolicy
metadata:
 name: 01-bgp-peering-policy
spec:
 nodeSelector:
   matchLabels:
     bgp-policy: bgppol-01
 virtualRouters:
 - localASN: 64522
   exportPodCIDR: true
   neighbors:
    - peerAddress: '<IP_ADDRESS_OF_ROUTER>/32'
      peerASN: 64512
      eBGPMultihopTTL: 10
      connectRetryTimeSeconds: 120
      holdTimeSeconds: 90
      keepAliveTimeSeconds: 30
      gracefulRestart:
        enabled: true
        restartTimeSeconds: 120
   serviceSelector:
     matchExpressions:
       - {key: somekey, operator: NotIn, values: ['never-used-value']}
4.2. Apply the BGP routing policy#
k apply -f bgppol-01.yaml
4.3. Label the nodes that the BGP policy should apply to#
k label nodes kube001 bgp-policy=bgppol-01
k label nodes kube002 bgp-policy=bgppol-01
4.4. Check the BGP peering status in Kubernetes#
cilium bgp peers
The resulting output should be similar to the one below
Node      Local AS   Peer AS   Peer Address   Session State   Uptime   Family         Received   Advertised
kube001   64522      64512     10.2.0.1       established     1m33s    ipv4/unicast   7          2
                                                                       ipv6/unicast   0          1
kube002   64522      64512     10.2.0.1       established     1m28s    ipv4/unicast   7          2
                                                                       ipv6/unicast   0          1
4.5. Check the BGP peers on the router#
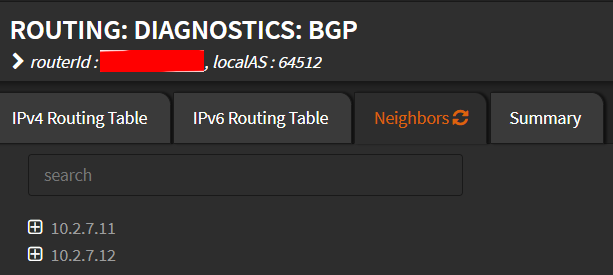
On the router (OPNSense), navigate to Routing -> Diagnostics -> BGP and you should see the Kubernetes worker nodes listed:

OPNSense BGP Peers List#
5. Allocate IP address range for Load Balancing endpoints#
5.1. Create YAML Config file#
Create a YAML config file similar to the one below (cilium-ippool.yaml):
---
apiVersion: "cilium.io/v2alpha1"
kind: CiliumLoadBalancerIPPool
metadata:
  name: "lb-pool"
spec:
  cidrs:
    - cidr: "10.44.0.0/16"
  disabled: false
5.2. Apply the Configuration#
k apply -f cilium-ippool.yaml
6. Install and configure Hubble Observability#
6.1. Enable Hubble#
cilium hubble enable --ui
Next, we will define the gateway and HTTP Route for Hubble and enable it so that the Hubble UI can be reached from other computers. This will verify that our Kubernetes setup and networking configuration is working and ready for subsequent tasks.
6.2. Create YAML config for Hubble Gateway#
Create a YAML config file similar to the one below (hubble-gateway.yaml):
---
apiVersion: gateway.networking.k8s.io/v1
kind: Gateway
metadata:
  name: hubble-gateway
  namespace: kube-system
spec:
  gatewayClassName: cilium
  listeners:
  - protocol: HTTP
    port: 80
    name: hubble-web
    allowedRoutes:
      namespaces:
        from: Same
---
apiVersion: gateway.networking.k8s.io/v1
kind: HTTPRoute
metadata:
  name: hubble-route
  namespace: kube-system
spec:
  parentRefs:
  - name: hubble-gateway
    namespace: kube-system
  rules:
  - matches:
    - path:
        type: PathPrefix
        value: /
    backendRefs:
    - name: hubble-ui
      port: 80
6.3. Apply the YAML Config#
k apply -f hubble-gateway.yaml
6.4. Verify the Service for the Hubble UI#
k get svc -A -o wide
You should see output similar to the below list. Note the External IP for the Hubble Gateway.
NAMESPACE     NAME                            TYPE           CLUSTER-IP      EXTERNAL-IP   PORT(S)                  AGE     SELECTOR
default       kubernetes                      ClusterIP      10.43.0.1       <none>        443/TCP                  5d20h   <none>
kube-system   cilium-gateway-hubble-gateway   LoadBalancer   10.43.160.80    10.44.0.1     80:31112/TCP             70s     <none>
kube-system   hubble-peer                     ClusterIP      10.43.252.196   <none>        443/TCP                  85m     k8s-app=cilium
kube-system   kube-dns                        ClusterIP      10.43.0.10      <none>        53/UDP,53/TCP,9153/TCP   5d20h   k8s-app=kube-dns
6.5. Open the Hubble UI in a browser#
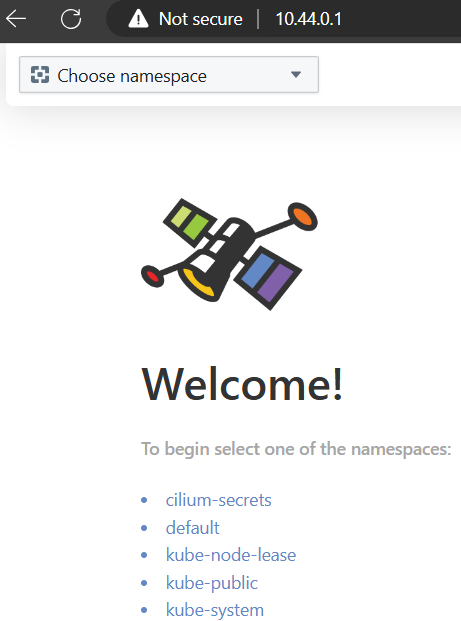
Open a browser and connect to the External IP address (http://10.44.0.1) for the Hubble Gateway.
You should be able to see a page similar to the one below:

Hubble UI#
At this point
Kubernetes is installed on all nodes
BGP networking is configured
Cilium and Hubble are configured and working
The Hubble UI can be access using the Kubernetes Gateway API
If you prefer, you can stop at this point because you have a working K3S cluster that can run pods and services that do not require persistent storage.
However, if you want to have persistent storage available for your pods, follow along as we configure Longhorn for providing in-cluster persistent storage for any pods that we decide to install in our cluster.

Comments
Comments powered by giscus, use a GitHub account to comment.